Introduction
This article is for those who need help setting up their new email address on Microsoft Outlook. We will cover most versions of Outlook from 2002 to 2013, If you are having issues with a version not mentioned below, please open a support ticket detailing your version the issue you are experiencing and we will be sure to get back to you as soon as possible.
Requirements
Before we can start you will need to make sure you have the following details ready:
- Your domain name (eg. mycompany.co.za)
- Your email address
- Your email password
Outlook 2013
Steps:
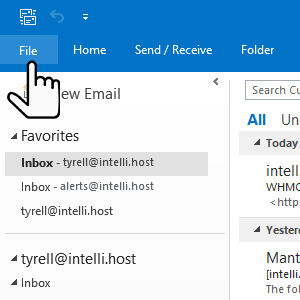
- Open Outlook.
- Click on File at the top left of your screen.
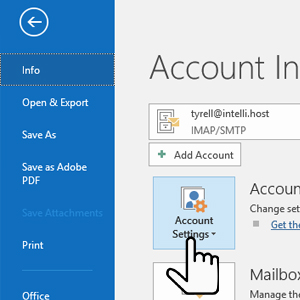
- Click on Account Settings then choose Account Settings from the dropdown menu.
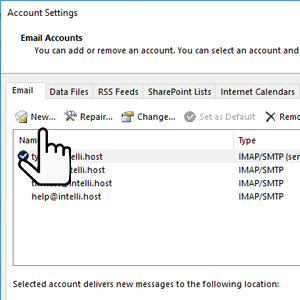
- Click on New... under the E-mail tab.
- Fill in your details in the fields.
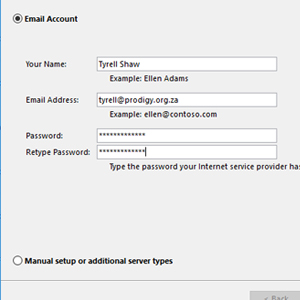
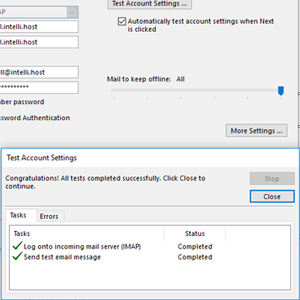
- After this you should see a pop up box which will display the status of your connection.
- Once this is complete your email should be up and running on Outlook 2013.
Manually Configure Outlook 2013
- follow steps above from step 1 to step 4
- click on Manual setup or additional server types
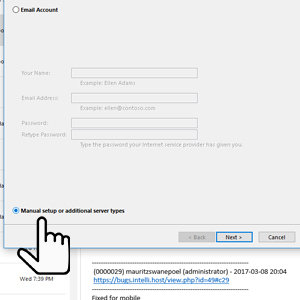
- Select POP or IMAP and then click Next

- Fill in the details with your information

- Click on More Settings
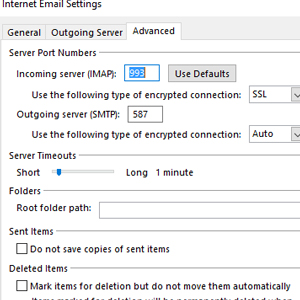
- Click on the Outgoing Server tab and make sure My outgoing server (SMPT) requires authentication and Use same settings as my incoming mail server is selected (advanced tab, click incoming and outgoing need port number)

- Click OK to save settings and then click Next
- Outlook will now test and complete your email setup.
Outlook 2011
- Open Outlook 2011
- If you are adding a new account to Outlook: Under the Tools menu click on Accounts
- Click on the Email Account icon
- Enter the following details:
- Enter your name as you want it to appear
- Enter your full email address: username@yourdomain.com
- Select POP3 or IMAP (We recommend IMAP)
- Enter the incoming mail server: mail.yourdomain.com
- Enter the outgoing (SMTP) server: mail.yourdomain.com
- Enter your Account Name: username@yourdomain.com
- Enter your email password
- Click on More Options to configure your outgoing server settings
- Under Authentication select “Use Incoming Server Info”
- Click OK to save your settings
Outlook 2010
- Open Oulook 2010
- Click file and select Add Account.
- Enter your full E-mail address and Password. (Outlook should automatically configure your account. If not please follow the next steps.)
Manually Configure Outlook 2010
- Open Outlook 2010
- Click File and select Add Account.
- Select “Manually configure server settings or additional server types”
- Select Internet Email and click next
- Enter the following details:
- Enter your name as you want it to appear.
- Enter your full email address: username@mydomain.com
- Select POP3 or IMAP (We recommend IMAP)
- Enter the incoming mail server: mail.mydomain.com
- Enter the outgoing (SMTP) server: mail.mydomain.com
- Enter your Account Name: username@mydomain.com
- Enter your email password.
- Click on more settingsand perform the following steps:
- Click on the Outgoing server tab.
- Select “My outgoing server (SMTP) requires authentication”
- Select “Use same settings as my incoming mail server”
- Click OK
- Click Test Account Settings (all items should have a green tick)
- Close the test window
- Click OK to save your settings
Outlook 2007
- Open Outlook 2007
- Under the Tools menu click on Account Settings
- Under the E-mail tab click on New
- Select “Microsoft Exchange, POP3, IMAP or HTTP.”
- Enter your email and password. If Outlook does not automatically configure your account, continue to the next section.
Manually Configure Outlook 2007
- Select Internet E-mail
- Fill in the following details:
- Enter your name as you want it to appear.
- Enter your full email address: username@mydomain.com
- Select POP3 or IMAP (IMAP recommended)
- Enter the incoming mail server: mail.mydomain.com
- Enter the outgoing (SMTP) server: mail.mydomain.com
- Enter your Account Name: username@mydomain.com
- Enter your email password.
- Click on more settingsand perform the following steps:
- Click on the Outgoing server tab.
- Select “My outgoing server (SMTP) requires authentication”
- Select “Use same settings as my incoming mail server”
- Click OK
- Click Test Account Settings (all items should have a green tick)
- Close the test window
- Click OK to save your settings
Outlook 2003
- Open Outlook 2003
- Under the Tools menu select E-mail Accounts.
- Click Add New E-mail Account and then click Next
- Select POP3 and IMAP
- Fill in the following details:
- Enter your name as you want it to appear.
- Enter your full email address: username@mydomain.com
- Enter your User Name: username@mydomain.com
- Enter your email password.
- Enter the incoming mail server: mail.mydomain.com
- Enter the outgoing (SMTP) server: mail.mydomain.com
- Click on More Settingsand perform the next steps:
- Click on the Outgoing Sever tab
- Select “My Outgoing Server (SMTP) Requires Authentication.”
- Select “Use same settings as my incoming mail server.”
- Click OK
- Click Test Account Settings (all items should have a green tick)
- Close the test window
- Click Next to save your settings
Outlook Express and Outlook 2002
- Open Outlook
- Under the Tools menu select Accounts
- Click Add and then click Mail
- Enter your name and click Next
- Enter your full E-mail address and click Next
- Select POP3 or IMAPform the drop down menu
- Enter the incoming mail server: mail.mydomain.com
- Enter the outgoing (SMTP) server: mail.mydomain.com
- Enter your username (same as your E-mail address)
- Enter your E-mail password and click Next
- If you do not want to import information click Do not import at this time and click Next
- Click Finish and perform the following steps:
- Under the Tools menu select Accounts
- Highlight mail.example.com and click properties
- Click the Servers tab and select “My server requires authentication” then click Settings
- Select “Use same settings as my incoming mail server” and click OK
- Click OK for the properties window to save your settings.
Troubleshooting
If you experience any issues sending E-mails, try the following:
In internet E-mail settings, click More Settings
Under the Advanced tab, change the Outgoing server (SMTP) port to the alternate port of 465, with SSL encryption then click OK.
